Review
In the previous section, we have created the Java classes and discussed the download process. In this section, we will focus on the Jasper layout and study how to design one using iReport.Table of Contents
Part 1: Introduction and Functional SpecsPart 2: Java classes
Part 3: Jasper layout with iReport
Part 4: HTML and jqGrid
Part 5: XML configuration
Part 6: Running the Application
Jasper Layout
The Jasper report layout is basically an XML document. You can create it through any text editor (if you know the syntax) or you can use a WYSWYG-editor. We choose the latter because it's easier.What is iReport?
iReport is the free, open source report designer for JasperReports. Create very sophisticated layouts containing charts, images, subreports, crosstabs and much more. Access your data through JDBC, TableModels, JavaBeans, XML, Hibernate, CSV, and custom sources. Then publish your reports as PDF, RTF, XML, XLS, CSV, HTML, XHTML, text, DOCX, or OpenOffice.
Source: iReport
Final Design
Before we proceed, let's preview the final design:
Admittedly, this isn't the best looking design, but it's good enough for our purpose.
Project Structure
Below is a screenshot of the project's structure: |  |
Installation
To start using iReport, we must first download and install one. Below are the instructions for installing and running iReport in Windows (Ubuntu will follow later):Windows
1. Open a browser and visit the iReport site at http://jasperforge.org/projects/ireport

2. Click on the download button. It will ask you to register first, but you can skip it.
You should see the following options:

3. Choose the Windows installer.
4. Once the download is finished, install it.
Designing
We'll now start designing our report1. Run iReport

2. Go to File and click New. You should see the following window

3. Select Report and click on the Coffee Landscape template. You will be asked to save the project.

4. Click Finish when done. You should see the following window:

Now, it's time to design the report.
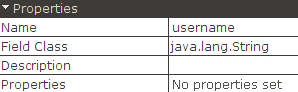
5. On the left side, under the Report Inspector, you should see a list of items. Expand the Fields section. You should see the following items: id, username, firstName, lastName, role.
Click on any of the fields and change their properties as indicated below (the Properties panel is located on the right-side):
 |  |
 | |
 | |
 | |
 |
6. On the left side, under the Report Inspector, expand the Detail section. You should see the following items: $F{id}, $F{username}, $F{firstName}, $F{lastName}, $F{role}. These are value placeholders.
Click on any of the fields and change their properties as indicated below. Make sure to edit the Detail section itself and the bounding box as well.
 |  |
 | |
 | |
 | |
 | |
 |
7. On the left side, under the Report Inspector, expand the Column Header section. You should see the following items: ID, Username, First Name, LastName, Role. These are the labels for each fields accordingly.
Click on any of the fields and change their properties as indicated below. Make sure to edit the Detail section itself and the bounding box as well.
 |  |
 | |
 | |
 | |
 |
8. Now, let's update the title. Change it from Coffee Title to User Records


9. Update the subtitle as well. Change it from Coffee SubTitle to A Summary:

10. We're done with the design. Now, let's update the report's programming language (This is critical!). Click outside the report layout. Then on the Properties panel, scroll down and look for the Language property. Change it from Groovy to Java!
Before | After |
Transferring the Layout
After creating the design, we should now copy and save it to the classpath directory of our Spring project.Here are the steps:
1. Open the folder or directory where you saved your report. Notice that the images are saved along with the report.
- coffee.jpg: an image
- coffee_stain.jpg: an image
- users.jasper: compiled report (we don't need this one)
- users.jrxml: the report layout (this is important)

2. Copy all the files except the users.jasper and paste it under the src/main/resources folder of your Spring project.

That's it! We've completed the transfer.
Next
In the next section, we will focus on the presentation layer, in particular the tabular display of our records using jqGrid and HTML. Click here to proceed.|
Share the joy:

|
 Subscribe by reader
 Subscribe by email
Share
Subscribe by email
Share
is there one step thats missing? In step 5 we already see the list of fields firstname, lastname, role, etc - how did the bind of the java class happen? or am i missing something here?
ReplyDeleteI have read your blog its very attractive and impressive. I like it your blog.
ReplyDeleteSpring online training Spring online training Spring Hibernate online training Spring Hibernate online training Java online training
spring training in chennai spring hibernate training in chennai
update Skincare บำรุงผิวหน้า
ReplyDeleteเซรั่ม
ReplyDeleteI will be looking forward to your next post. Thank you
เปา กิ่งกาญจน์ แปลงโฉม สวยออร่านางงามจับ
Internet Business Ideas for 2020
ReplyDelete