Thursday, February 16, 2012

Spring Batch Tutorial (Part 1)

In this tutorial, we will create a simple Spring Batch application to demonstrate how to process a series of jobs where the primary purpose is to import a lists of comma-delimited and fixed-length records. In addition, we will add a web interface using Spring MVC to teach how to trigger jobs manually, and so that we can visually inspect the imported records. In the data layer, we will use JPA, Hibernate, and MySQL.


Dependencies

  • Spring core 3.1.0.RELEASE
  • Spring Batch 2.1.8.RELEASE
  • See pom.xml for details

Github

To access the source code, please visit the project's Github repository (click here)

Functional Specs

Before we start, let's define the application's specs as follows:
  • Import a list of comma-delimited records
  • Import a list of fixed-length records
  • Import a list of mixed-type records
  • Jobs must be triggered using a web interface
  • Display the imported records in a web interface
  • Each record represents a user and its associated access levels

Here's our Use Case diagram:
[User]-(Import job1)
[User]-(Import job2) 
[User]-(Import job3) 
[User]-(View records)

The CSV Files

To visualize what we want to do, let's examine first the files that we plan to import:

User Files

user1.csv
This file contains comma-separated value (CSV) records representing User records. Each line has the following tokens: username, first name, last name, password.

user2.csv
This file contains fixed-length records representing User records. Each line has the following tokens: username(positions 1-5), first name(6-9), last name(10-16), password(17-25).

user2.csv
This file contains comma-separated value and fixed-length records representing User records. Each line has the following tokens: username, first name, last name, password.

This file contains two types of CSV-records:
  • DELIMITED-RECORD-A: uses the standard comma delimiter
  • DELIMITED-RECORD-B: uses | delimiter

It also contains two types of fixed-length records:
  • FIXED-RECORD-A: username(16-20), first name(21-25), last name(26-31), password(32-40)
  • FIXED-RECORD-B: username(16-21), first name(22-27), last name(28-33), password(35-42)

Role Files

role1.csv
This file contains comma-separated value (CSV) records representing Role records. Each line has the following tokens: username and access level.

role2.csv
This file contains fixed-length records representing Role records. Each line has the following tokens: username and access level.

role3.csv
This file contains comma-separated value (CSV) records representing Role records. Each line has the following tokens: username and access level.

By now you should have a basic idea of the file formats that we will be importing. You must realize that all we want to do is import these files and display them on a web interface.

Diagrams

Here's the Class diagram:
# Cool UML Diagram
[User|id;firstName;lastName;username;password;role{bg:orange}]1--1> [Role|id;role{bg:green}]

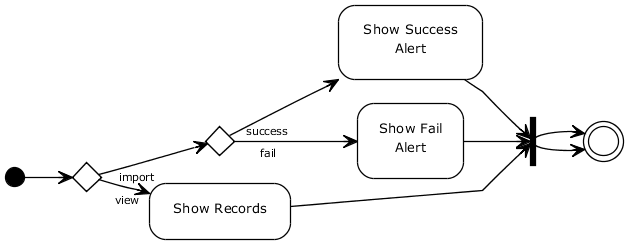
Here's the Activity Diagram:

(start)->import->success->(Show Success Alert)->|a|->(end),
fail->(Show Fail Alert)->|a|,
view->(Show Records)->|a|->(end)

Screenshots

Let's preview how the application will look like after it's finished. This is also a good way to clarify further the application's specs.

Entry page
The entry page is the primary page that users will see. It contains a table showing user records and four buttons for adding, editing, deleting, and reloading data. All interactions will happen in this page.

Entry page


Next

In the next section, we will write the Java classes. Click here to proceed.
StumpleUpon DiggIt! Del.icio.us Blinklist Yahoo Furl Technorati Simpy Spurl Reddit Google I'm reading: Spring Batch Tutorial (Part 1) ~ Twitter FaceBook

Subscribe by reader Subscribe by email Share

Spring Batch Tutorial (Part 4)

Review

We have just completed our application! In the previous sections, we have discussed how to perform batch processing with Spring Batch. We have also created a Spring MVC application to act as a web interface. In this section, we will build and run the application using Maven, and demonstrate how to import the project in Eclipse.


Running the Application

Access the source code

To download the source code, please visit the project's Github repository (click here)

Preparing the data source

  1. Run MySQL (install one if you don't have one yet)
  2. Create a new database:
    spring_batch_tutorial
  3. Import the following file which is included in the source code under the src/main/resources folder:
    schema-mysql.sql
    This script contains Spring Batch infrastructure tables which can be found in the Spring Batch core library. I have copied it here separately for easy access.

Building with Maven

  1. Ensure Maven is installed
  2. Open a command window (Windows) or a terminal (Linux/Mac)
  3. Run the following command:
    mvn tomcat:run
  4. You should see the following output:
    [INFO] Scanning for projects...
    [INFO] Searching repository for plugin with prefix: 'tomcat'.
    [INFO] artifact org.codehaus.mojo:tomcat-maven-plugin: checking for updates from central
    [INFO] artifact org.codehaus.mojo:tomcat-maven-plugin: checking for updates from snapshots
    [INFO] ------------------------------------------
    [INFO] Building spring-batch-tutorial Maven Webapp
    [INFO]    task-segment: [tomcat:run]
    [INFO] ------------------------------------------
    [INFO] Preparing tomcat:run
    [INFO] [apt:process {execution: default}]
    [INFO] [resources:resources {execution: default-resources}]
    [INFO] [tomcat:run {execution: default-cli}]
    [INFO] Running war on http://localhost:8080/spring-batch-tutorial
    Feb 13, 2012 9:36:54 PM org.apache.catalina.startup.Embedded start
    INFO: Starting tomcat server
    Feb 13, 2012 9:36:55 PM org.apache.catalina.core.StandardEngine start
    INFO: Starting Servlet Engine: Apache Tomcat/6.0.29
    Feb 13, 2012 9:36:55 PM org.apache.catalina.core.ApplicationContext log
    INFO: Initializing Spring root WebApplicationContext
    Feb 13, 2012 9:37:01 PM org.apache.coyote.http11.Http11Protocol init
    INFO: Initializing Coyote HTTP/1.1 on http-8080
    Feb 13, 2012 9:37:01 PM org.apache.coyote.http11.Http11Protocol start
    INFO: Starting Coyote HTTP/1.1 on http-8080
    
  5. Note: If the project will not build due to missing repositories, please enable the repositories section in the pom.xml!

Access the Entry page

  1. Follow the steps with Building with Maven
  2. Open a browser
  3. Enter the following URL (8080 is the default port for Tomcat):
    http://localhost:8080/spring-batch-tutorial/

Import the project in Eclipse

  1. Ensure Maven is installed
  2. Open a command window (Windows) or a terminal (Linux/Mac)
  3. Run the following command:
    mvn eclipse:eclipse -Dwtpversion=2.0
  4. You should see the following output:
    [INFO] Scanning for projects...
    [INFO] Searching repository for plugin with prefix: 'eclipse'.
    [INFO] org.apache.maven.plugins: checking for updates from central
    [INFO] org.apache.maven.plugins: checking for updates from snapshots
    [INFO] org.codehaus.mojo: checking for updates from central
    [INFO] org.codehaus.mojo: checking for updates from snapshots
    [INFO] artifact org.apache.maven.plugins:maven-eclipse-plugin: checking for updates from central
    [INFO] artifact org.apache.maven.plugins:maven-eclipse-plugin: checking for updates from snapshots
    [INFO] -----------------------------------------
    [INFO] Building spring-batch-tutorial Maven Webapp
    [INFO]    task-segment: [eclipse:eclipse]
    [INFO] -----------------------------------------
    [INFO] Preparing eclipse:eclipse
    [INFO] No goals needed for project - skipping
    [INFO] [eclipse:eclipse {execution: default-cli}]
    [INFO] Adding support for WTP version 2.0.
    [INFO] -----------------------------------------
    [INFO] BUILD SUCCESSFUL
    [INFO] -----------------------------------------
    
    This command will add the following files to your project:
    .classpath
    .project
    .settings
    target
    You may have to enable "show hidden files" in your file explorer to view them
  5. Open Eclipse and import the project

Conclusion

That's it! We've have successfully completed our Spring Batch application and learned how to process of jobs in batches. We've also added Spring MVC support to allow jobs to be controlled online.

I hope you've enjoyed this tutorial. Don't forget to check my other tutorials at the Tutorials section.

Revision History


Revision Date Description
1 Feb 16 2012 Uploaded tutorial and Github repository

StumpleUpon DiggIt! Del.icio.us Blinklist Yahoo Furl Technorati Simpy Spurl Reddit Google I'm reading: Spring Batch Tutorial (Part 4) ~ Twitter FaceBook

Subscribe by reader Subscribe by email Share

Spring Batch Tutorial (Part 2)

Review

In the previous section, we have laid down the functional specs of the application and examined the raw files that are to be imported. In this section, we will discuss the project's structure and write the Java classes.


Project Structure

Our application is a Maven project and therefore follows Maven structure. As we create the classes, we've organized them in logical layers: domain, repository, service, and controller.

Here's a preview of our project's structure:

The Layers

Disclaimer

I will only discuss the Spring Batch-related classes here. And I've purposely left out the unrelated classes because I have described them in detail already from my previous tutorials. See the following guides:

Controller Layer

The BatchJobController handles batch requests. There are three job mappings:
  • /job1
  • /job2
  • /job3
Everytime a job is run, a new JobParameter is initialized as the job's parameter. We use the current date to be the distinguishing parameter. This means every job trigger is considered a new job.

What is a JobParameter?

"how is one JobInstance distinguished from another?" The answer is: JobParameters. JobParameters is a set of parameters used to start a batch job. They can be used for identification or even as reference data during the run:

Source: Spring Batch - Chapter 3. The Domain Language of Batch

Notice we have injected a JobLauncher. It's primary job is to start our jobs. Each job will run asynchronously (this is declared in the XML configuration).

What is a JobLauncher?

JobLauncher represents a simple interface for launching a Job with a given set of JobParameters:

Source: Spring Batch - Chapter 3. The Domain Language of Batch


Batch Layer

This layer contains various helper classes to aid us in processing batch files.
  • UserFieldSetMapper - maps FieldSet result to a User object
  • RoleFieldSetMapper - maps FieldSet result to a Role object. To assign the user, an extra JDBC query is performed
  • MultiUserFieldSetMapper - maps FieldSet result to a User object; it removes semi-colon from the first token.
  • UserItemWriter - writes a User object to the database
  • RoleItemWriter - writes a Role object to the database. To assign the user, an extra JDBC query is performed


Next

In the next section, we will focus on the configuration files. Click here to proceed.
StumpleUpon DiggIt! Del.icio.us Blinklist Yahoo Furl Technorati Simpy Spurl Reddit Google I'm reading: Spring Batch Tutorial (Part 2) ~ Twitter FaceBook

Subscribe by reader Subscribe by email Share

Spring Batch Tutorial (Part 3)

Review

In the previous section, we have written and discussed the Spring Batch-related classes. In this section, we will write and declare the Spring Batch-related configuration files.


Configuration

Properties File

The spring.properties file contains the database name and CSV files that we will import. A job.commit.interval property is also specified which denotes how many records to commit per interval.


Spring Batch

To configure a Spring Batch job, we have to declare the infrastructure-related beans first. Here are the beans that needs to be declared:

  • Declare a job launcher
  • Declare a task executor to run jobs asynchronously
  • Declare a job repository for persisting job status

What is Spring Batch?

Spring Batch is a lightweight, comprehensive batch framework designed to enable the development of robust batch applications vital for the daily operations of enterprise systems. Spring Batch builds upon the productivity, POJO-based development approach, and general ease of use capabilities people have come to know from the Spring Framework, while making it easy for developers to access and leverage more advance enterprise services when necessary. Spring Batch is not a scheduling framework.

Source: Spring Batch Reference Documentation

What is a JobRepository?

JobRepository is the persistence mechanism for all of the Stereotypes mentioned above. It provides CRUD operations for JobLauncher, Job, and Step implementations.

Source: Spring Batch - Chapter 3. The Domain Language of Batch

What is a JobLauncher?

JobLauncher represents a simple interface for launching a Job with a given set of JobParameters

Source: Spring Batch - Chapter 3. The Domain Language of Batch

Here's our main configuration file:


Notice we've also declared the following beans:
  • Declare a JDBC template
  • User and Role ItemWriters

Job Anatomy

Before we start writing our jobs, let's examine first what constitutes a job.

What is a Job?

A Job is an entity that encapsulates an entire batch process. As is common with other Spring projects, a Job will be wired together via an XML configuration file

Source: Spring Batch: The Domain Language of Batch: Job

Each job contains a series of steps. For each of step, a reference to an ItemReader and an ItemWriter is also included. The reader's purpose is to read records for further processing, while the writer's purpose is to write the records (possibly in a different format).

What is a Step?

A Step is a domain object that encapsulates an independent, sequential phase of a batch job. Therefore, every Job is composed entirely of one or more steps. A Step contains all of the information necessary to define and control the actual batch processing.

Source: Spring Batch: The Domain Language of Batch: Step

Each reader typically contains the following properties
  • resource - the location of the file to be imported
  • lineMapper - the mapper to be used for mapping each line of record
  • lineTokenizer - the type of tokenizer
  • fieldSetMapper - the mapper to be used for mapping each resulting token

What is an ItemReader?

Although a simple concept, an ItemReader is the means for providing data from many different types of input. The most general examples include: Flat File, XML, Database

Source: Spring Batch: ItemReaders and ItemWriters

What is an ItemWriter?

ItemWriter is similar in functionality to an ItemReader, but with inverse operations. Resources still need to be located, opened and closed but they differ in that an ItemWriter writes out, rather than reading in.

Source: Spring Batch: ItemReaders and ItemWriters

The Jobs

As discussed in part 1, we have three jobs.

Job 1: Comma-delimited records

This job contains two steps:
  1. userLoad1 - reads user1.csv and writes the records to the database
  2. roleLoad1 - reads role1.csv and writes the records to the database
Notice userLoad1 is using DelimitedLineTokenizer and the properties to be matched are the following: username, firstName, lastName, password. Whereas, roleLoad1 is using the same tokenizer but the properties to be matched are the following: username and role.

Both steps are using their own respective FieldSetMapper: UserFieldSetMapper and RoleFieldSetMapper.

What is DelimitedLineTokenizer?

Used for files where fields in a record are separated by a delimiter. The most common delimiter is a comma, but pipes or semicolons are often used as well.

Source: Spring Batch: ItemReaders and ItemWriters


Job 2: Fixed-length records

This job contains two steps:
  1. userLoad2 - reads user2.csv and writes the records to the database
  2. roleLoad2 - reads role2.csv and writes the records to the database

Notice userLoad2 is using FixedLengthTokenizer and the properties to be matched are the following: username, firstName, lastName, password. However, instead of matching them based on a delimiter, each token is matched based on a specified length: 1-5, 6-9, 10-16, 17-25 where 1-5 represents the username and so forth. The same idea applies to roleLoad2.

What is FixedLengthTokenizer?

Used for files where fields in a record are each a 'fixed width'. The width of each field must be defined for each record type.

Source: Spring Batch: ItemReaders and ItemWriters


Job 3: Mixed records

This job contains two steps:
  1. userLoad3 - reads user3.csv and writes the records to the database
  2. roleLoad3 - reads role3.csv and writes the records to the database

Job 3 is a mixed of Job 1 and Job 2. In order to mix both, we have to set our lineMapper to PatternMatchingCompositeLineMapper.

What is PatternMatchingCompositeLineMapper?

Determines which among a list of LineTokenizers should be used on a particular line by checking against a pattern.

Source: Spring Batch: ItemReaders and ItemWriters

For the FieldSetMapper, we are using a custom implementation MultiUserFieldSetMapper which removes a semicolon from the String. See Part 2 for the class declaration.


Next

In the next section, we will run the application using Maven. Click here to proceed.
StumpleUpon DiggIt! Del.icio.us Blinklist Yahoo Furl Technorati Simpy Spurl Reddit Google I'm reading: Spring Batch Tutorial (Part 3) ~ Twitter FaceBook

Subscribe by reader Subscribe by email Share